Hey there all you GenXers. In honor of National Preparedness Month, I wanted to share with you some thoughts on one of the biggest parts of being prepared – Making A Plan…
But first, before I really launch into it, I wanted to start with a special thanks to our listeners and viewers. We’ve hit more than 500 downloads of our podcast in about one month! That’s a pretty incredible feat! And we wouldn’t be here without you, our loyal audience. Thank you and thank you!
For those who haven’t already done so, consider subscribing at:
With all that said, onto the blog of the day… It is National Preparedness Month, and that mainly means we focus on two things, making a plan and creating a go bag. We’ve spent some time in a couple of past episodes talking about the different types of bags; edc, go-bag and bug out bags, and the get home safe bag. And for sure we’ll dig deeper into these in future episodes.
For today we’re focusing on the first half, making a plan.
I think one of the important concepts around making a plan is first to realize it’s never just one plan at all! There can be…
- Fire escape plan – the most popular preparedness-related search on Google
- Shelter In place plan – Wanna keep it all in the homestead
- Evacuation route planning – don’t forget the backup routes
- Water collection plan – Most important survival topic aside from the air we breath
- Communications plan – How can we talk to each other, and where can we meet
- Financial plan – got your budget planned out
This I’m sure is one of the reasons it can take a while to make a plan – when you consider… all the plans.
Before I go into my thoughts on these different plans, I also wanted to share some simple resources for those starting out brand new…
- Ready.gov – the base link that provides a simplistic, and yet well organized means to start getting organized in preparedness
- Communications plan – a very detailed plan on how a family can start getting all the communications together (collecting Information, ensure everyone has a copy, and talk about it on regular basis)
- Family emergency plan – this is part of the Read.gov site, but delves more deeply into preparing for families with kids (younger, as well as older teens).
There are a plethora of sites and videos and podcasts we can all use when making our plan. Many of these sites are so much more informative than these I’ve listed. However, for those first starting out, I recommend this group of sites because it drastically simplifies the process of making a plan and starting out on your preparedness journey. They tend to lean heavily on the government providing solutions to our preparedness problems, but I think that’s because these days, so many people already rely on the government.
Over time, individuals and communities can and should become more self reliant, so they don’t have to rely on the government. That’s part of the reason Ed and I started the podcast, to start building community (virtually), to inform and educate, and even to learn more for ourselves from what others are doing.
Let’s take a look at some of the most basic plans we can make.
Planning to Shelter In Place
For Shelter in place I personally think, and I believe most preparedness-minded people walk this same path, that it’s important to first define what are your greatest threats. If you know what you and your community are most at risk of encountering, then you can more easily prepare to combat them.
In some of our episodes of GenXTalkin – On Being Prepared, we’ve touched briefly on the different types of threat events, but I’d like to clarify these very quickly…
High Impact, High Frequency – traffic jams, reside in or travel through a dangerous area, fires in certain areas, epidemics and disease breakouts, house fires
High Impact, Low Frequency – large weather events, emp, hacking/cyber attack on fuel pipelines, regional attacks, regional wildfires, loss of source of income
Low Impact, High Frequency – traffic jams, vehicle out of gas, pick pockets or mugging (could be higher impact), ran out of food at home
Low Impact, Low Frequency – heat waves, gas prices risen, minimal storm surge
One helpful way to understand realistic threat events in your area is to use the National Risk Index.
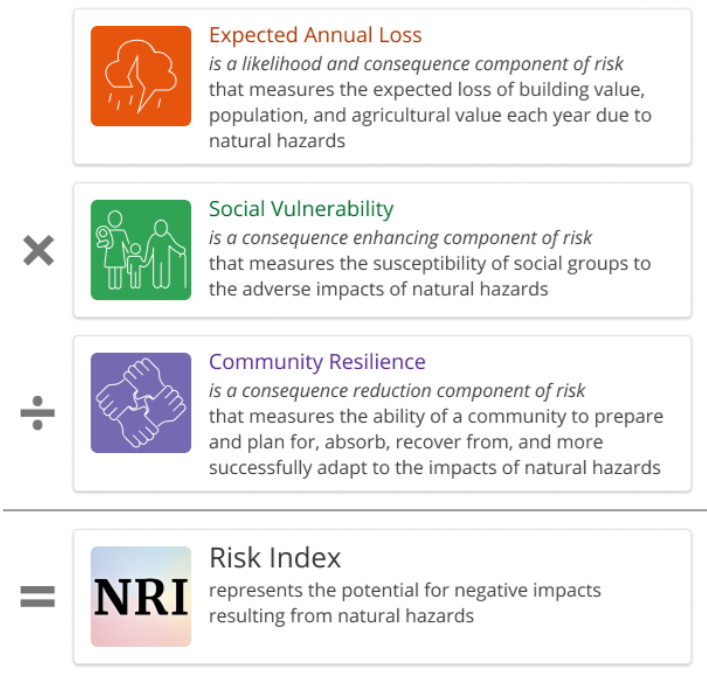
This is primarily for natural hazards, but has some additional factors as well. Click on the link and look for the “Explore the Map” option. This will open an interactive map of the US, allowing users to zoom into their respective county. Select a county of interest, and in a side panel, the following options are available:
- Risk Index – risk levels relative to the natural hazard threat (hurricane, tornado, volcano…), and compared to other areas of the state and nation.
- Expected Annual Loss – based upon property values and potential for risk
- Social Vulnerability – how susceptible is the community to the adverse impacts of natural hazards.
- Community Resilience – ability for a community to prepare for anticipated natural hazards, adapt to changing conditions, and withstand and recover rapidly from disruptions.
One more important aspect of this Index is one can quickly create a report, similar to this one for Cook Country (Chicago area), which shows these results for your selected county (CAUTION: it may take a while to load in the next tab). This can be a great tool for getting to the main root of what problems may occur for your community. Armed with this information we can get an idea of what itmes we may need to purchase or organize in case the threat event occurs.
Planning to Evacuate or Get Out Quick
The government recommends having a Bugout, or Go Bag in the event you have to get away from home quickly. And most preparedness minded organizations add onto this in saying, within 15 minutes, you should be ready to go with all you need for at least 72 hours, but supplies for one week is even better. Preparing to evacuate can be a scary, and daunting task, and it can take on many forms.
The most popular search on Google, if you look up the keyword preparedness, is related to Fire Safety. So you really should start here. How to prepare self and family in case of fire is very prevalent in the minds of folks in the US. For an individual, it really can be as simple as becoming familiar with escape routes from each room. If you’re at work or school, take a look at the fire escape plan. Just about every building will have one posted in a very public place, because OSHA Standards basically require it for businesses. Know which way you would go if there were a fire alarm, and regularly do a quick review of that path, so you can recognize it, even when you can’t see (due to smoke).
As well, if you travel for work, get in the habit of doing this in hotels, airports and your temporary place of work. Good to at least get a basic idea of layouts.
You will also come to realize that many organizations themselves identify a “Floor Safety Manager”, who is someone very familiar with how to respond in emergencies, and is tasked with regular drills and directing people where to go during those emergencies.
Interesting fact from the September 11, 2001 WTC Attacks. Many lives were saved because a couple of very dedicated safety managers drilled the escape plan so many times over the years. Those safety managers were in the WTC building when the original attack occured in 1993.
Next, create a fire escape plan at home. This should be two fold. First, ensure everyone knows how to get out of the house very quickly and by multiple pathways. This way if one direction is blocked, they can get out another way without hesitation. It also might be fun one of these days to wake the family up in the middle of the night with very loud music and banging while you’re waving a flashlight around yelling “FIRE! FIRE!, EVERYONE OUT! HURRY!!” ; )
Also consider where your gathering points might be staged. There should be two, one right outside the house (near a tree) and one should be slightly further away, like a neighbor’s front porch. These locations should be clear to anyone visiting as well. Saying something like “gather where the old tire swing used to hang” won’t help visitors understand, whereas “Go to the big tree in the front yard” would work great!
Planning Your Communications
Most important here is understanding how important it is to have proper communications. Without communications, how will we know:
- where to meet up
- when to meet up
- what do we do when the first meet up location fails
- What are our next steps
- what direction I’m headed
- or simply… is my family OK?
Start with the basics for the Communications Plan. First, collect important information such as phone numbers; for each other, for friends and family, for doctors, hospitals, dentists, ob-gyn, etc. Collect information around children’s school (including college), and adult workplace emergency plans. Where will the kids be taken (and how, by bus?) in a time of emergency? Always include out of town contacts to use as go-between during large events, and establish a time to check in at regular intervals.
Adding onto the fire escape plan above, establish meeting places ahead of time for additional purposes.
- Indoor – in case of extreme weather, such as tornadoes
- In your neighborhood – like the neighbor’s front porch in case you can’t get into your home
- Outside your neighborhood – to meet up if you’re not at home during emergencies and cannot cannot get there
- Outside your own town or city, or even state or region – for cases in which you cannot get home and you’ve been instructed to evacuate the area
Next up is to share the information with the family. This is super important. Make small laminated sheets for each to hold in a wallet, purse or backpack. Having this information handy will allow each family member to respond well and recover faster.
Consider adding a couple of apps to your smartphone. My wife and I belong to a volunteer organization called CERT (Community Emergency Response Team). These are present in most urban and suburban areas in the US. Many of these groups create their own smartphone apps, but they also have directed us to the following:
- AED – which gives a dynamic map for locations of AED (Automated external defibrillators) units – for helping those suffering from heart attack.
- PulsePoint – emergency organizations around the country submit their events to this app, providing a service like the old scanners, so you can receive alerts on your phone when different emergencies (utilities, natural disasters, flooding, traffic, etc.) occur in your area.
- USNG – a way to locate yourself during emergencies. This can be key for emergency services trying to locate you during a disaster,
- CodeRed – Mobile alert service similar to the PulsePoint service above.
- 311 – Often local counties will have their own version of an app for reporting issues in your area. This is more for community awareness, not necessarily emergencies
- ERG2020 – Ever wonder what those different colored diamonds on the back of trucks and shipping containers mean? This is the app to answer those questions. Enter the number on teh diamond, or just browse, and you can see the meaning, potential hazard, what the public should do, and how emergency services should respond if there is an issue with the vehicle.
- Compass – Oh yeah! although if you’re properly prepared, you probably already have an analog compass in your Emergency Kit… Why not have the Compass app as well on your phone?
II’ll finish up the communications plan section with two points. One of the problems that often occurs during natural disasters is that cell phone services get “clogged”. Basically your phone calls just can’t get through, because the network is overloaded with people just trying to reach their loved ones. So, start with just texting instead. Texts are much smaller packets, and a couple of quick lines of text can deliver the message and free up the network for more emergency-type uses.
Second, while you have the chance, take a look around your area with your smartphone. Try to find additional locations at which you can connect to the internet via WIFI. I’m talking about those free locations, like hotels and coffee shops that offer them up for their customers. If you’re stuck in the city, and you can move about on foot, get to a location that still has WIFI up and running and you can be better informed during the emergency. Of course, you want to make sure this is actually a free service. Very frustrating when you’re in the midst of an emergency, and you have to enter a credit card, or email information to gain access. Also, a good reason to plan this ahead is you also want the ability to recognize the WIFI network you’re using. This would be a prime situation for hackers to try to capture unwitting users’ private information by “sniffing” or monitoring that WIFI network. Whether emergency or not, you never want to transmit your personal data, unprotected by VPN, across an unknown WIFI network!
Lastly, you should come to realize that preparedness does not stop at the end of National Preparedness Month… Keep going, and remember that “practice makes PROGRESS!”